2017年4月19日星期三

systemd管理shadowsocks-libev多端口自启动

以下在Debian8和CentOS7测试成功。仅路径有所不同。
安装参考shadowsocks-libev在github的说明。Debian用jessie-backports安装,CentOS用Fedora-Copr安装。


以下说明为Debian8上的操作。


cp /lib/systemd/system/shadowsocks-libev.service /lib/systemd/system/shadowsocks-libev1.service
nano /lib/systemd/system/shadowsocks-libev1.service

#  This file is part of shadowsocks-libev.
#
#  Shadowsocks-libev is free software; you can redistribute it and/or modify
#  it under the terms of the GNU General Public License as published by
#  the Free Software Foundation; either version 3 of the License, or
#  (at your option) any later version.
#
#  This file is default for Debian packaging. See also
#  /etc/default/shadowsocks-libev for environment variables.

[Unit]
Description=Shadowsocks-libev 1 Server Service
Documentation=man:shadowsocks-libev(8)
After=network.target

[Service]
Type=simple
EnvironmentFile=/etc/default/shadowsocks-libev1
User=nobody
Group=nogroup
LimitNOFILE=32768
ExecStart=/usr/bin/ss-server -c $CONFFILE $DAEMON_ARGS

[Install]
WantedBy=multi-user.target


cp /etc/default/shadowsocks-libev /etc/default/shadowsocks-libev1
nano /etc/default/shadowsocks-libev1

# Defaults for shadowsocks initscript
# sourced by /etc/init.d/shadowsocks-libev
# installed at /etc/default/shadowsocks-libev by the maintainer scripts

#
# This is a POSIX shell fragment
#
# Note: `START', `GROUP' and `MAXFD' options are not recognized by systemd.
# Please change those settings in the corresponding systemd unit file.

# Enable during startup?
START=yes

# Configuration file
CONFFILE="/etc/shadowsocks-libev/config1.json"

# Extra command line arguments
DAEMON_ARGS="-u -v"

# User and group to run the server as
USER=nobody
GROUP=nogroup

# Number of maximum file descriptors
MAXFD=32768


cp /etc/shadowsocks-libev/config.json /etc/shadowsocks-libev/config1.json
nano /etc/default/shadowsocks-libev1

修改config1.json文件。
systemctl enable shadowsocks-libev1
systemctl start shadowsocks-libev1
systemctl status shadowsocks-libev1

2017年4月8日星期六

EdgeRouter Lite更换U盘

EdgeRouter Lite 确实性能强悍,但是自带的 USB 存储质量确实一般。

下面介绍 EdgeRouter Lite 原有 USB 存储损坏后新 U 盘制作系统启动盘的方法。此操作需要一定的 Linux 基础,但无需额外的辅助设备( Console 线等)。进需要两个U盘,一台电脑即可完成。(一个U盘是用来替换原有EdgeRouter Lite里面已损坏的U盘,这个U盘要注意尺寸,太大装不下。容量根据自己需要来,2G以上。另一个U盘用来制作Linux启动盘,4G以上)。

一、准备 Linux 环境

如果你已经有 Linux 操作系统,那么请跳过这一步。
下载 Deepin 安装盘:
https://www.deepin.org/download/
推荐64位,使用ISO内的启动盘制作工具制作一个USB启动盘。
开机后切换到U盘启动,按“上”方向键进入failsafe模式启动。

二、分区

使用Deepin自带的图形界面GParted分区编辑器对要替换的U盘进行分区,一个分区至少150M,fat16格式;剩余空间设置为第二个分区,ext3格式,两个分区均为主分区。

为第一个分区设置lba标志。

三、放入启动镜像

1、下载固件

从UBNT官网下载EdgeRouter Lite固件:
https://www.ubnt.com/download/edgemax
或者:
http://www.ubnt.com.cn/download/
下载固件为tar格式,解压。

2、将固件放入U盘

将vmlinux.tmp重命名为vmlinux.64
将vmlinux.tmp.md5重命名为vmlinux.64.md5
将vmlinux.64和vmlinux.64.md5复制到第一个分区(fat16)。

将squashfs.tmp重命名为squashfs.img
将squashfs.tmp.md5重命名为squashfs.img.md5
将version.tmp重命名为version
将上述三个文件复制到第二个分区,由于ext3分区有权限管理,无法直接复制,打开深度终端Deepin Terminal,执行命令:
cd /home/deepin/Desktop/ER-e100.v1.9.1.4939093 #
sudo mv squashfs.img /media/deepin/3b0232gersfffesfes-abi3hf #具体路径可以在文件管理器中点选路径栏查看。
sudo mv squashfs.img.md5 /media/deepin/3b0232gersfffesfes-abi3hf
sudo mv version /media/deepin/3b0232gersfffesfes-abi3hf

3、创建数据可写目录

sudo mkdir /media/deepin/3b0232gersfffesfes-abi3hf/w
大功告成,可以放入EdgeRouter Lite启动了。

第一次启动,多等一会~

2017年2月15日星期三

EdgeRouter 使用dnsmasq 进行广告过滤

参考:https://help.ubnt.com/hc/en-us/articles/205223340-EdgeRouter-Ad-blocking-content-filtering-using-EdgeRouter


第一步,获取并生成conf配置文件:
#!/bin/bash
# define variables
host_version=0
host_new=0
host_url="
https://raw.githubusercontent.com/vokins/yhosts/master/hosts"

cd /root/hosts
echo
date
echo
echo +++ Delete old files...
echo
rm -f temp1 temp2 temp3 result host
rm -f hosts*

echo +++ Download new hosts file...
echo
wget $host_url

echo +++ Check if download succeeded...
echo
if [ ! -f hosts ]; then
    echo --- Download failed... Exit.
    exit
fi

host_version=$(sed -n '1p' version | awk -F"=" '{print $2}')
cat hosts|grep version|sed -n 1p > version
host_new=$(sed -n '1p' version | awk -F"=" '{print $2}')

echo +++ Version check:
echo +++ Old: $host_version, New: $host_new

# check hosts version
if [ "$host_version"x = "$host_new"x ]; then
    echo --- No update for hosts. Exit
    exit
fi


########################################################
# following lines are just shell learning, ignore.
# get column 2, space as delimiter.
# cat hosts|cut -d ' ' -f 2
#
# compress extra space
# cat hosts|tr -s ' '
#
# compress extra space and get column 2, space as delimiter
# cat hosts|tr -s ' '|cut -d ' ' -f 2
#
# remove comment line start with "#"
# cat hosts| grep -v ^# | grep -v ^$
########################################################

echo
echo +++ Split hosts file to two column file.
cat hosts| grep -v ^# | grep -v ^$|tr -s ' '|cut -d ' ' -f 1 >temp1
cat hosts| grep -v ^# | grep -v ^$|tr -s ' '|cut -d ' ' -f 2 >temp2

# combine two files and add "address=/" at beginning of each line
echo +++ Combine two column file to one.
paste temp2 temp1 -d "/" | sed 's/^/address=\/&/g' >temp3
echo +++ Add self defined hosts
cat self temp3 > result
# remove ipv6 address and useless hosts
echo +++ Remove useless hosts.
sed -e '/\:/d' result | sed -e '/XiaoQiang/d' | sed -e '/localhost/d' > conf

echo +++ Delete temp files.
rm -f temp1 temp2 temp3 result

echo
echo +++ Copy files to web folder
cp -f ./version /usr/share/nginx/html/hosts/
cp -f ./conf /usr/share/nginx/html/hosts/
echo --- Hosts conf file updated.


将上述脚本设置为Linux开机启动。


第二步,配置EdgeRouter

2017年1月3日星期二

2016年12月30日星期五

Shadowsocks-libev 多用户 多端口 多实例 自启动

shadowsocks-libev并不像go版本或python版本的shadowsocks客户端/服务端软件那样直接支持多实例配置(相关说明看这里)。shadowsocks-libev需要通过加载不同的配置文件来实现多端口使用。


在CentOS启动脚本shadowsocks-libev的基础上做修改,实现多个配置文件自动加载:


#!/bin/bash
#
# Script to run Shadowsocks in daemon mode at boot time for multiple
# config.json file.
# ScriptAuthor: icyboy, update by nksmiles
# Revision 2.0 - 30th Dec. 2016
#============================================================
# Run level information:
# chkconfig: 2345 99 99
# Description: lightweight secured scoks5 proxy
# processname: ss-server
# Author: Max Lv <
max.c.lv@gmail.com>;
# Run "/sbin/chkconfig --add shadowsocks" to add the Run levels.
#============================================================

#============================================================
# Paths and variables and system checks.

# Source function library
. /etc/rc.d/init.d/functions

# Check that networking is up.
[ ${NETWORKING} ="yes" ] || exit 0

# Daemon
NAME=shadowsocks-server
DAEMON=/usr/bin/ss-server

##################################
# Path to the configuration file.
# Multiple config.json files are listed here.
CONF=/etc/shadowsocks-libev/config.json
CONF1=/etc/shadowsocks-libev/config1.json
##################################

#USER="nobody"
#GROUP="nobody"

# Take care of pidfile permissions
mkdir /var/run/$NAME 2>/dev/null || true
#chown "$USER:$GROUP" /var/run/$NAME

# Check the configuration file exists.
#
if [ ! -f $CONF ] ; then
    echo "The configuration file cannot be found!"
    exit 0
fi

if [ ! -f $CONF1 ] ; then
    echo "The configuration file1 cannot be found!"
    exit 0
fi

# Path to the lock file.
LOCK_FILE=/var/lock/subsys/shadowsocks

##################################
# Path to the pid file.
# Multiple pid files are listed here
PID=/var/run/$NAME/pid
PID1=/var/run/$NAME/pid1
##################################


#====================================================================
# Run controls:

RETVAL=0
# Start shadowsocks as daemon.
start() {
    if [ -f $LOCK_FILE ]; then
         echo "$NAME is already running!"
         exit 0
    else
         echo -n $"Starting ${NAME}: "
         #daemon --check $DAEMON --user $USER "$DAEMON -f $PID -c $CONF > /dev/null"
         daemon $DAEMON -c $CONF -f $PID
         #multiple config.json file
         daemon $DAEMON -c $CONF1 -f $PID1
    fi

    RETVAL=$?
    [ $RETVAL -eq 0 ] && success
    echo
    [ $RETVAL -eq 0 ] && touch $LOCK_FILE
    return $RETVAL
}


# Stop shadowsocks.
stop() {
    echo -n $"Shutting down ${NAME}: "
    killproc -p ${PID}
    #killproc multiple PID
    killproc -p ${PID1}
    RETVAL=$?
    [ $RETVAL -eq 0 ]
    rm -f $LOCK_FILE
    rm -f ${PID}
    #remove multiple PID
    rm -f ${PID1}
    echo
    return $RETVAL
}

# See how we were called.
case "$1" in
    start)
         start
         ;;
    stop)
         stop
         ;;
    restart)
         stop
         start
         ;;
    condrestart)
         if [ -f $LOCK_FILE ]; then
         stop
         start
         RETVAL=$?
         fi
         ;;
    status)
         status $DAEMON
         RETVAL=$?
         ;;
    *)
         echo $"Usage: $0 {start|stop|restart|condrestart|status}"
         RETVAL=1
esac

exit $RETVAL


将上述脚本保存为/etc/init.d/shadowsocks-libev并添加执行权限,就可以用下面命令启动了:
/etc/init.d/shadowsocks-libev start

启动后,可以通过以下命令查看ss-server是否监听了两个配置文件的端口:
netstat -tlnp


另外,也可以通过修改以上启动脚本来实现更多配置文件的加载。

2016年12月28日星期三

搬瓦工CentOS 6安装Lighttpd、PHP、SQLite和Zblog

参考链接:

https://www.howtoforge.com/installing-lighttpd-with-php5-php-fpm-and-mysql-support-on-centos-6.4-p2

1、前提

服务器IP使用192.168.0.100

2、安装Lighttpd

因为CentOS的官方软据仓库中不包含Lighttpd和PHP-FPM,所以我们需要启用Remi RPM 软件仓库和EPEL软件仓库:
rpm --import https://fedoraproject.org/static/0608B895.txt
wget http://dl.fedoraproject.org/pub/epel/6/x86_64/epel-release-6-8.noarch.rpm
rpm -ivh epel-release-6-8.noarch.rpm
rpm --import http://rpms.famillecollet.com/RPM-GPG-KEY-remi
rpm -ivh http://rpms.famillecollet.com/enterprise/remi-release-6.rpm
yum install yum-priorities

编辑/etc/yum.repos.d/epel.repo...
vi /etc/yum.repos.d/epel.repo

添加行priority=10到[epel]部分:
[epel]
name=Extra Packages for Enterprise Linux 6 - $basearch
#baseurl=http://download.fedoraproject.org/pub/epel/6/$basearch
mirrorlist=https://mirrors.fedoraproject.org/metalink?repo=epel-6&arch=$basearch
failovermethod=priority
enabled=1
priority=10
gpgcheck=1
gpgkey=file:///etc/pki/rpm-gpg/RPM-GPG-KEY-EPEL-6
[...]

然后同样修改/etc/yum.repos.d/remi.repo文件的[remi]部分,并将enable改为1:
vi /etc/yum.repos.d/remi.repo

[remi]
name=Les RPM de remi pour Enterprise Linux $releasever - $basearch
#baseurl=http://rpms.famillecollet.com/enterprise/$releasever/remi/$basearch/
mirrorlist=http://rpms.famillecollet.com/enterprise/$releasever/remi/mirror
enabled=1
priority=10
gpgcheck=1
gpgkey=file:///etc/pki/rpm-gpg/RPM-GPG-KEY-remi
failovermethod=priority

[remi-test]
name=Les RPM de remi en test pour Enterprise Linux $releasever - $basearch
#baseurl=http://rpms.famillecollet.com/enterprise/$releasever/test/$basearch/
mirrorlist=http://rpms.famillecollet.com/enterprise/$releasever/test/mirror
enabled=0
gpgcheck=1
gpgkey=file:///etc/pki/rpm-gpg/RPM-GPG-KEY-remi

然后可以通过下面的命令安装Lighttpd:
yum install lighttpd

之后我们创建Lighttpd的系统启动链接并将其启动(之后系统启动时Lighttpd自动启动):
chkconfig --levels 235 lighttpd on
/etc/init.d/lighttpd start

如果Lighttpd启动时失败,并报如下错误信息...
(network.c.203) socket failed: Address family not supported by protocol


打开/etc/lighttpd/lighttpd.conf...
vi /etc/lighttpd/lighttpd.conf

并更改server.use-ipv6,由enable改为disable:
[...]
##
## Use IPv6?
##
server.use-ipv6 = "disable"
[...]

然后尝试重启Lighttpd,现在应该可以正常工作了:
/etc/init.d/lighttpd start

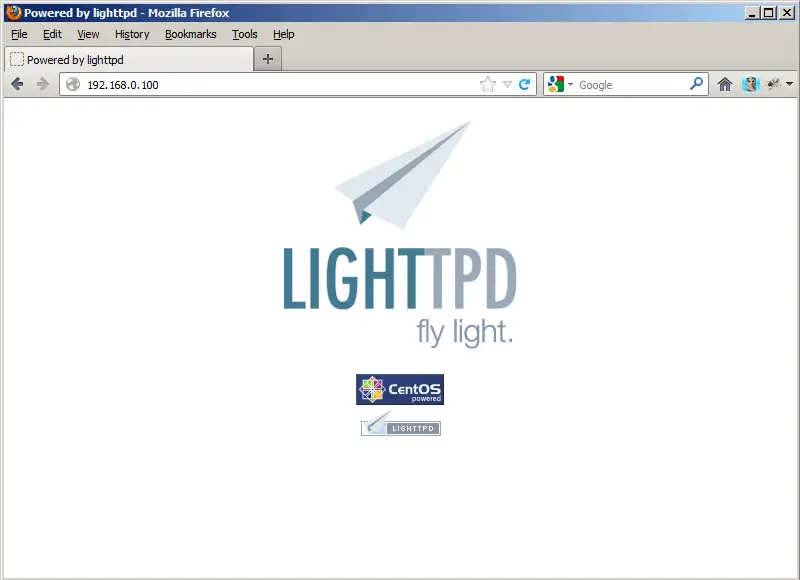
现在直接在浏览器中输入地址http://192.168.0.100,你应该看到下面的页面:


在CentOS 6.4上Lighttpd的默认文档根目录/var/www/lighttpd/,配置文件是/etc/lighttpd/lighttpd.conf。

3、安装PHP5

我们可以通过PHP-FPM使得PHP5在Lighttpd上工作,我们安装下述软件包:
yum install php-fpm lighttpd-fastcgi

PHP-FPM是守护进行,运行FastCGI服务在端口9000上。
打开/etc/php-fpm.d/www.conf...
vi /etc/php-fpm.d/www.conf

并将user和group设置为lighttpd:
[...]
; Unix user/group of processes
; Note: The user is mandatory. If the group is not set, the default user's group
;       will be used.
; RPM: apache Choosed to be able to access some dir as httpd
user = lighttpd
; RPM: Keep a group allowed to write in log dir.
group = lighttpd
[...]

为PHP-FPM创建系统启动链接并将其启动:
chkconfig --levels 235 php-fpm on
/etc/init.d/php-fpm start

为了在Lighttpd中启用PHP5,我们必须修改两个文件,/etc/php.ini/etc/lighttpd/lighttpd.conf。首先我们打开/etc/php.ini并取出cgi.fix_pathinfo=1这一行前面的注释:
vi /etc/php.ini

[...]
; cgi.fix_pathinfo provides *real* PATH_INFO/PATH_TRANSLATED support for CGI.  PHP's
; previous behaviour was to set PATH_TRANSLATED to SCRIPT_FILENAME, and to not grok
; what PATH_INFO is.  For more information on PATH_INFO, see the cgi specs.  Setting
; this to 1 will cause PHP CGI to fix its paths to conform to the spec.  A setting
; of zero causes PHP to behave as before.  Default is 1.  You should fix your scripts
; to use SCRIPT_FILENAME rather than PATH_TRANSLATED.
; http://www.php.net/manual/en/ini.core.php#ini.cgi.fix-pathinfo
cgi.fix_pathinfo=1
[...]

然后我们打开/etc/lighttpd/modules.conf并取出include "conf.d/fastcgi.conf"这一行前面的注释:
vi /etc/lighttpd/modules.conf

[...]
##
## FastCGI (mod_fastcgi)
##
include "conf.d/fastcgi.conf"
[...]

然后打开/etc/lighttpd/conf.d/fastcgi.conf:
vi /etc/lighttpd/conf.d/fastcgi.conf

fastcgi.server这一部分,保留原来的注释并添加你自己的fastcgi.server部分,如下:
[...]
## PHP Example
## For PHP don't forget to set cgi.fix_pathinfo = 1 in the php.ini.
##
## The number of php processes you will get can be easily calculated:
##
## num-procs = max-procs * ( 1 + PHP_FCGI_CHILDREN )
##
## for the php-num-procs example it means you will get 17*5 = 85 php
## processes. you always should need this high number for your very
## busy sites. And if you have a lot of RAM. :)
##


fastcgi.server += ( ".php" =>
        ((
                "host" => "127.0.0.1",
                "port" => "9000",
                "broken-scriptfilename" => "enable"
        ))
)

#fastcgi.server = ( ".php" =>
#                   ( "php-local" =>
#                     (
#                       "socket" => socket_dir + "/php-fastcgi-1.socket",
#                       "bin-path" => server_root + "/cgi-bin/php5",
#                       "max-procs" => 1,
#                       "broken-scriptfilename" => "enable",
#                     )
#                   ),
[...]

然后我们重启Lighttpd:
/etc/init.d/lighttpd restart

4、测试PHP5 / 获取PHP5的安装细节

默认网站文档根目录是/var/www/lighttpd/。现在我们在这个目录创建一个小PHP文件(info.php)并在浏览器中调用。这个文件会显示大量有关PHP安装的有用细节,例如所安装的PHP版本。
vi /var/www/lighttpd/info.php

<?php
phpinfo();
?>

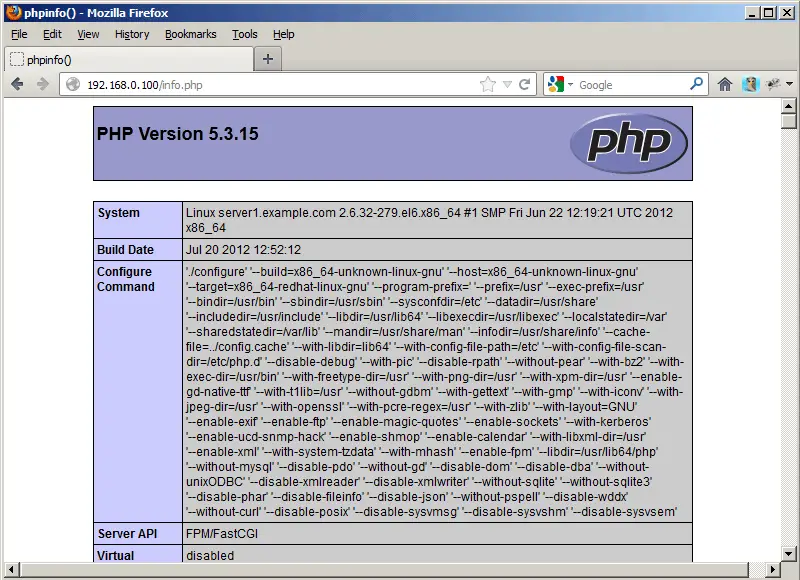
现在我们在浏览器中调用文件(例如http://192.168.0.100/info.php):


正如你所看到的,PHP5正在工作,并通过FPM/FastCGI工作,正如在Server API那一行所显示的。如果你继续向下滚动,你会看到在PHP5中已经启用的模块。

5、安装SQLite3

默认情况下,通过yum安装的PHP应该包含SQLite3,可以通过下面命令进一步确认:
yum install sqlite

6、让PHP-FPM 使用Unix Socket

默认情况下PHP-FPM监听127.0.0.1上的9000端口。也可以让PHP-FPM使用Unix socket,这样可以避免TCP开销。要这样做,打开/etc/php-fpm.d/www.conf...
vi /etc/php-fpm.d/www.conf


并将下面几行做如下更改:
[...]
;listen = 127.0.0.1:9000
listen = /tmp/php5-fpm.sock
[...]
listen.owner = lighttpd
listen.group = lighttpd
listen.mode = 0660
[...]


然后重新加载:
/etc/init.d/php-fpm reload

下一步打开Lighttpd的PHP配置文件/etc/lighttpd/conf.d/fastcgi.conf并将域名和端口相应的行替换为"socket" => "/tmp/php5-fpm.sock":
vi /etc/lighttpd/conf.d/fastcgi.conf

fastcgi.server += ( ".php" =>
        ((
                "socket" => "/tmp/php5-fpm.sock",
                "broken-scriptfilename" => "enable"
        ))
)

最后重启Lighttpd:
/etc/init.d/lighttpd restart

7、下载并安装zblog


cd /var/www/lighttpd
wget https://github.com/zblogcn/zblogphp/releases/download/1626/Z-BlogPHP_1_5_0_1626_Zero.zip
yum install unzip
unzip Z-BlogPHP_1_5_0_1626_Zero.zip
chown lighttpd:lighttpd /var/www/lighttpd/* -R
rm index.html

2016年12月27日星期二

CentOS 6安装Shadowsocks-libev以及相关配置

参考Shadowsocks-libev在Github上的说明:
download yum repo on Fedora Copr and put it inside /etc/yum.repos.d/.


在Fedora Copr上下载软件仓库配置文件:


将配置文件放置到/etc/yum.repos.d/:
mv librehat-shadowsocks-epel-6.repo /etc/yum.repos.d/


然后通过yum安装shadowsocks-libev:
yum update
yum install shadowsocks-libev


如果想把shadowsocks-libev作为服务运行,拷贝启动脚本shadowsocks-libev到/etc/init.d/目录下后,启动:
wget https://cokebar.info/wp-content/uploads/2014/11/shadowsocks-libev
mv shadowsocks-libev /etc/init.d/


然后可以通过以下命令在启动、停止和重启shadowsocks-libev服务:
/etc/init.d/shadowsocks-libev start
/etc/init.d/shadowsocks-libev stop
/etc/init.d/shadowsocks-libev restart


对于shadowsocks-libev有两点需要注意:
1. shadowsocks-libev以服务运行时无法输出日志:
https://github.com/shadowsocks/shadowsocks-libev/issues/174
2. shadowsock-libev不支持python版、go版的多端口配置:
https://github.com/shadowsocks/shadowsocks-libev/issues/5


移动光猫改桥接模式

使用以下管理用户名和密码登录移动光猫: 用户名:CMCCAdmin 密码:aDm8H%MdA 登陆后,查看“网络-宽带设置”,选择名称中含有“INTERNET”的连接名称,截图记录原有INTERNET设置: 截图记录后,删除此配置。 参考原有配置,新建一个INTERNET连接,并...